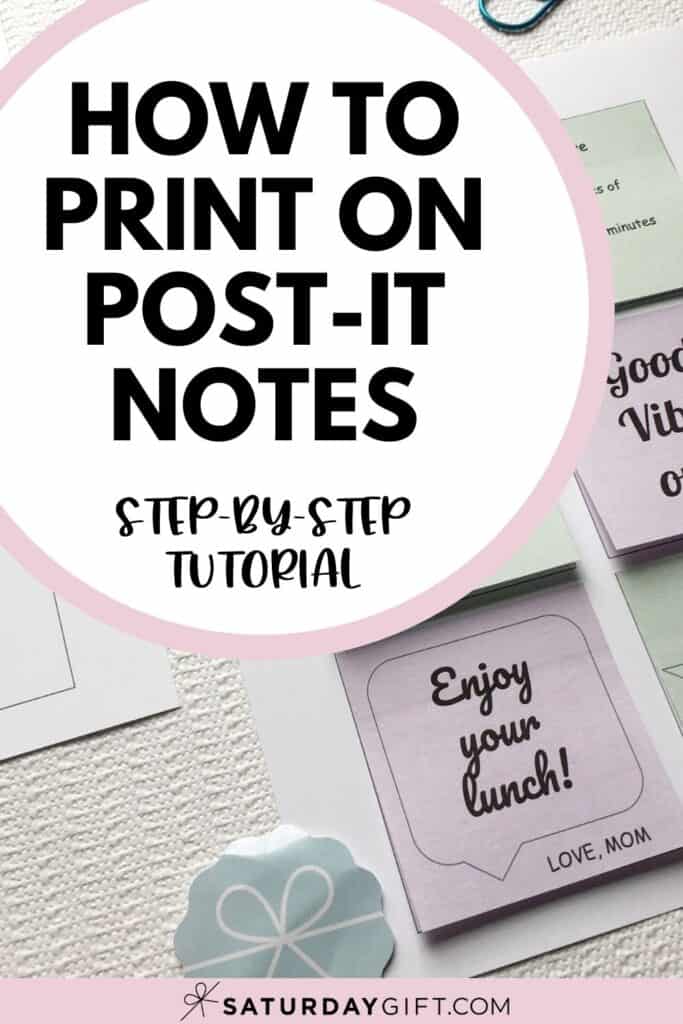
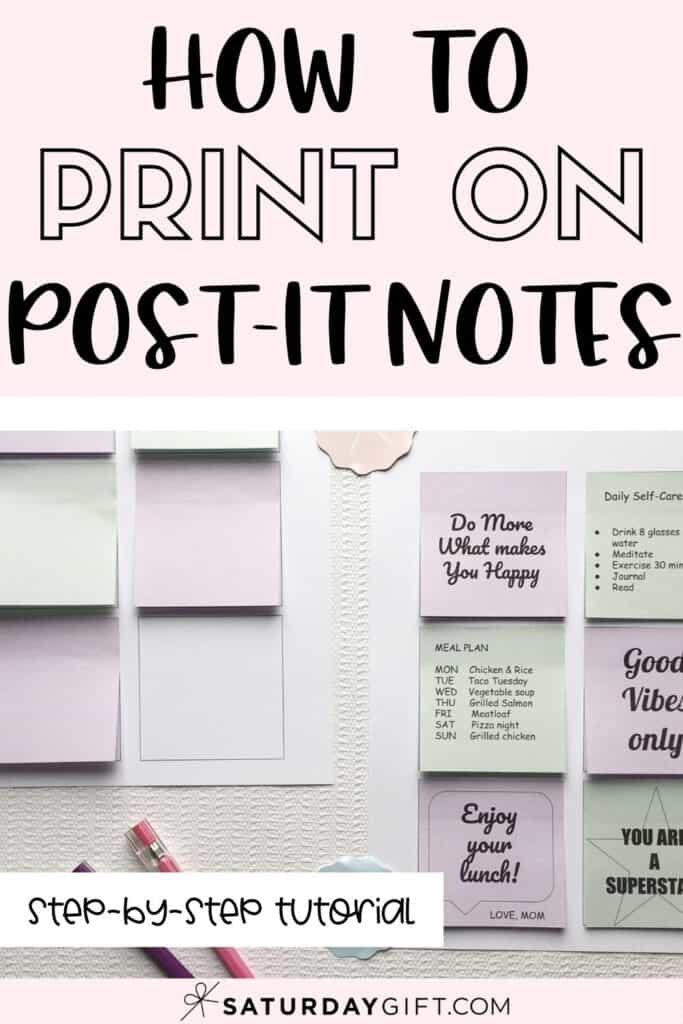
How To Print On Post-It Notes – Create Your Customized Sticky Notes
This post may contain affiliate links, which means I’ll receive a commission if you purchase through my links, at no extra cost to you. Please read full disclosure for more information.


Did you know that you can easily print on post-it notes? Want to know how to do that? I put together step-by-step instructions for you to transform your sticky notes to to-do lists, chores lists and inspirational quotes.
I don’t know about you, but my desk is packed with papers and post-it notes. Please tell me I’m not alone with this one!
And I’ve been working relentlessly to create a system where all the papers, notes, tasks, to-do’s, chores and ideas will have a “home”. And that I can streamline, simplify, organize and prettify (!) my work-life (and life-life) to have more time for more important things like the people I care about (including me!).
And while I’m doing that I’ll be sharing the printables I create with you, so that you can also organize, simplify and prettify your life.
And today you get to transform all your post-it notes into productivity notes by learning how to print on them! How cool is that! I’m so excited!
Materials & products I use and recommend
- Printer – I have this HP printer that I absolutely love.
- Paper to print the template
- Post-it notes or sticky-notes – I love these bright ones and these pastels ones
- Cute pens to write – I like these Stabilo Mini Pens.
- How to print on Post-it Notes – Instructions for this post
- Step-by-step instructions: How to create your custom print on Post-it notes templates in Google Slides (DIY)
- Step-by-step instructions: How to print on Post-it notes using my templates (Faster way)
- My ready-made print on post-it notes templates
- How to download my 'print on post-it notes' -templates
How to print on Post-it Notes – Instructions for this post
It’s super easy to print on sticky notes.
First I’ll walk you through step-by-step how to create your custom sticky notes in Google Slides.
But if you want to print pretty sticky notes even faster, I made you a templates to do that!
If you want to use my templates, you’ll just need to print out the the first template and add your Post-its on it and then put that paper with the post-its back to the printer.
And then there are three different templates you can choose from depending what you’d like to print on those notes.
There are
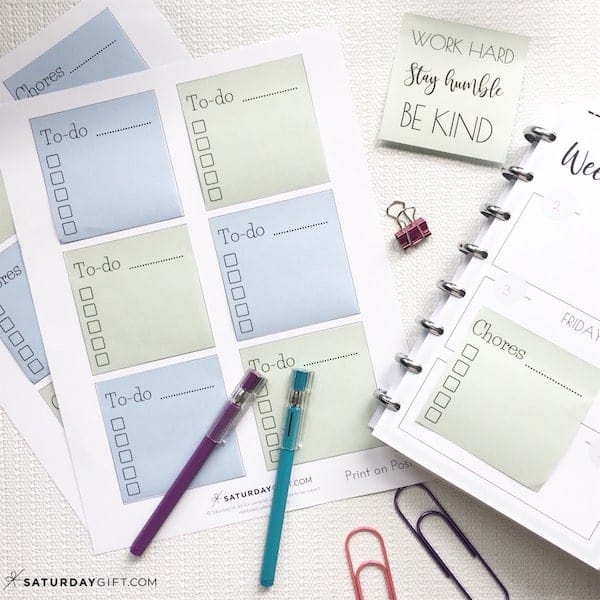
- To-do lists
- Chores checklists
- And inspirational quotes
But first I’ll walk you through how to make your own ones in Google Slides.
And then I’ll walk you through how to use my templates.
I hope that your new Post-it notes will simplify and prettify your desk or planner!
Step-by-step instructions: How to create your custom print on Post-it notes templates in Google Slides (DIY)
Here are the step-by-step instructions on how to create custom post-it notes using Google Slides.
You can use Microsoft Word or Pages if you prefer, but because not everyone has those programs on their computer, I wanted to make these instructions using a free program that everyone should have access.
And I find Google Slides easier than Google Docs, so that’s why I recommend Slides over Docs.
We’ll be creating two templates: one template for you to know where to place the sticky notes and the second one is for the designs you want to print on your Post-its.
So let’s go!
1. Start by opening Google Slides
2. Change the size of the slide (steps 1-5)
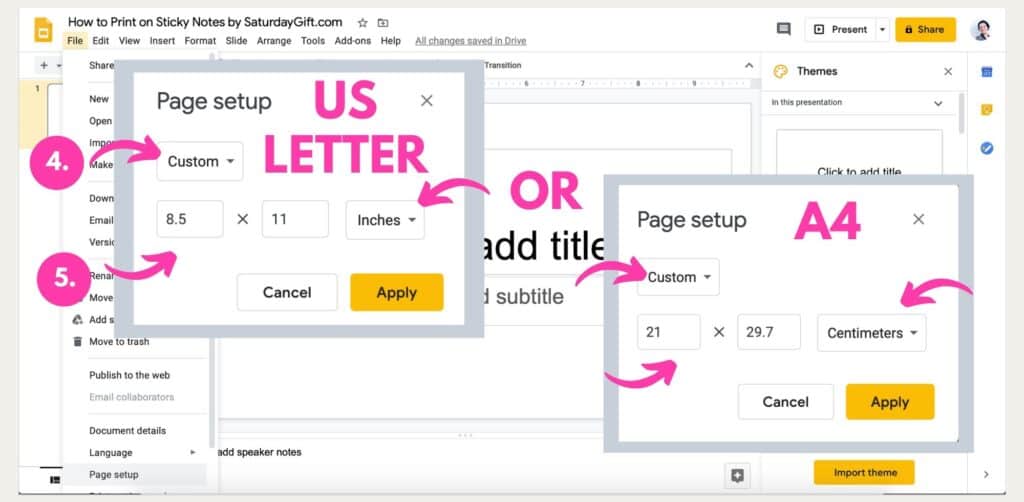
- Go to File (1) -> Page setup (2)
- And change the widescreen 16:9 to custom (3)

Make sure you have chosen “custom” (4.) and change the size of the paper you want to use (5.).
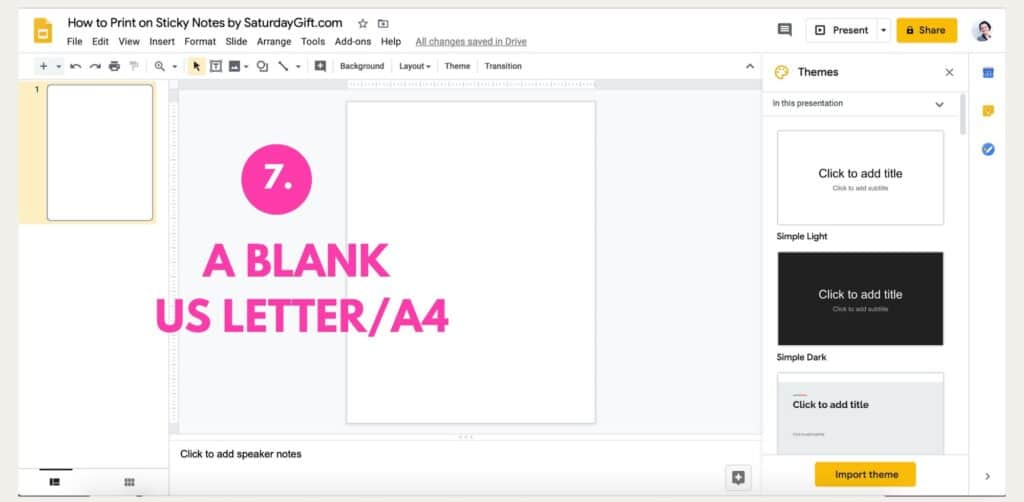
3. Make sure the slide is blank (steps 6 & 7)
- Delete titles and subtitles (6.) to create a blank slide (7.)
Template #1
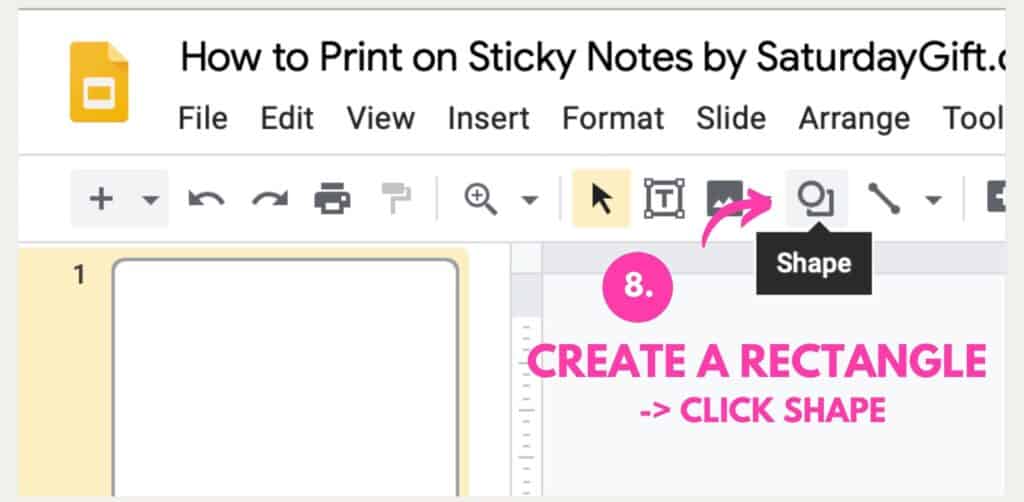
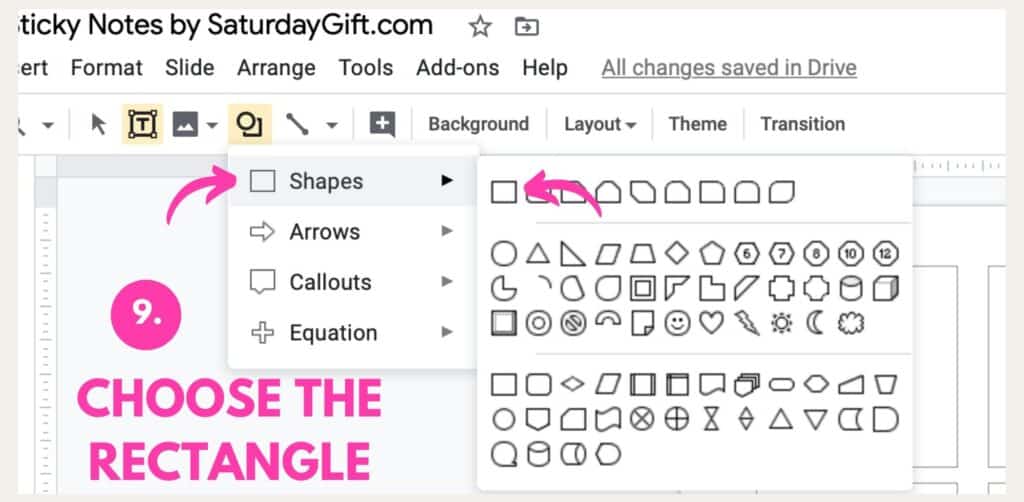
4. Create the first template with 6 rectangles on it
- Click Shape (8.) -> choose the rectangle (9.)
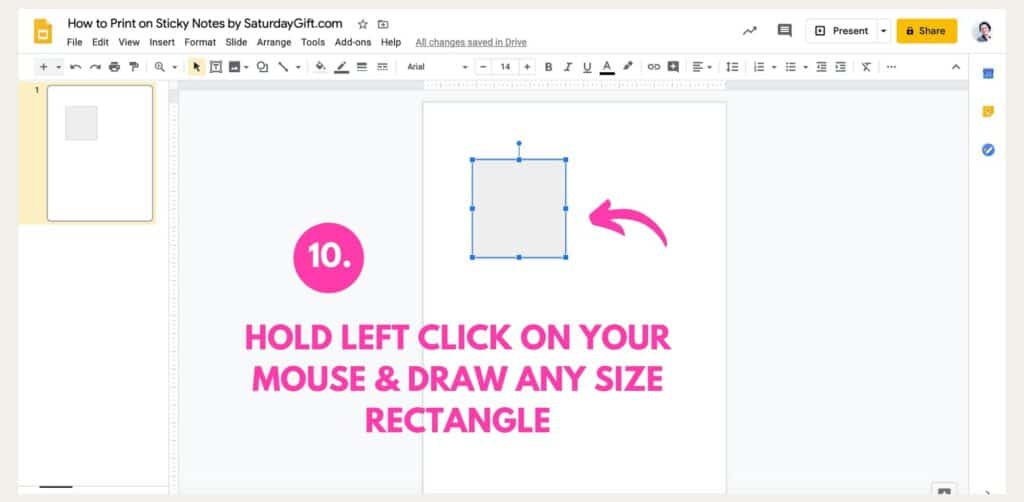
5. Create a rectangle (step 10)
- Hold left click on your mouse and draw any size rectangle (10.)
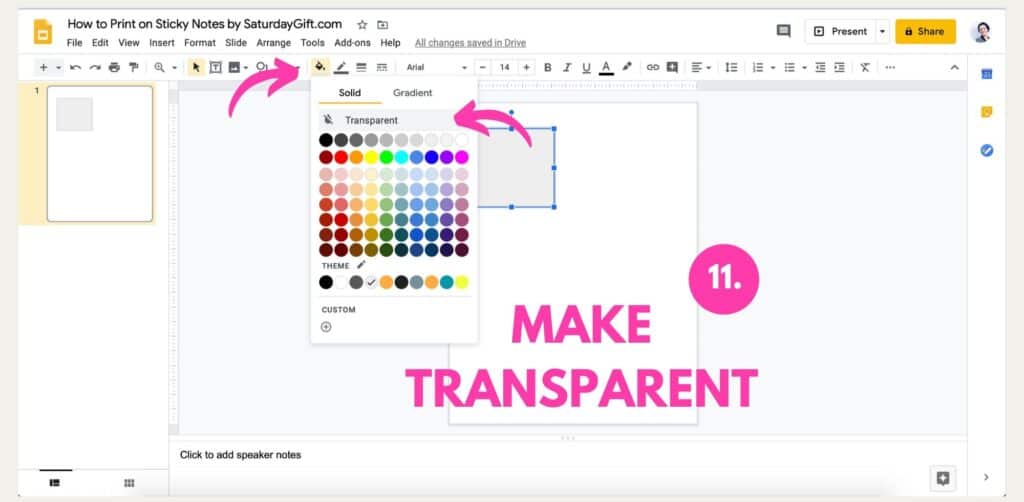
6. Make the rectangle transparent (step 11)
- Click on ‘fill color’ and then click on ‘Transparent’ (11.)
7. Resize the rectangle according to the Post-it notes you want to use (steps 12 & 13)
- Right click your mouse
- Choose ‘Format Options’ (12.)
- Change size by adding the widht and the height of the sticky notes you want to use (13.)
The standard sticky note is 3 x 3 inches, but check the size of the sticky notes you want to use.

8. Create a grid where you’ll later place the blank sticky notes (step 14)
- Copy-paste the rectangle/square you resized
- Move the copy-pasted rectangles to create a grid (14.)
If you use the 3 x 3 inch sticky notes the grid will have 2 x 3 squares in it. And now your TEMPLATE #1 is ready! Next we’ll create the TEMPLATE #2. 
Template #2
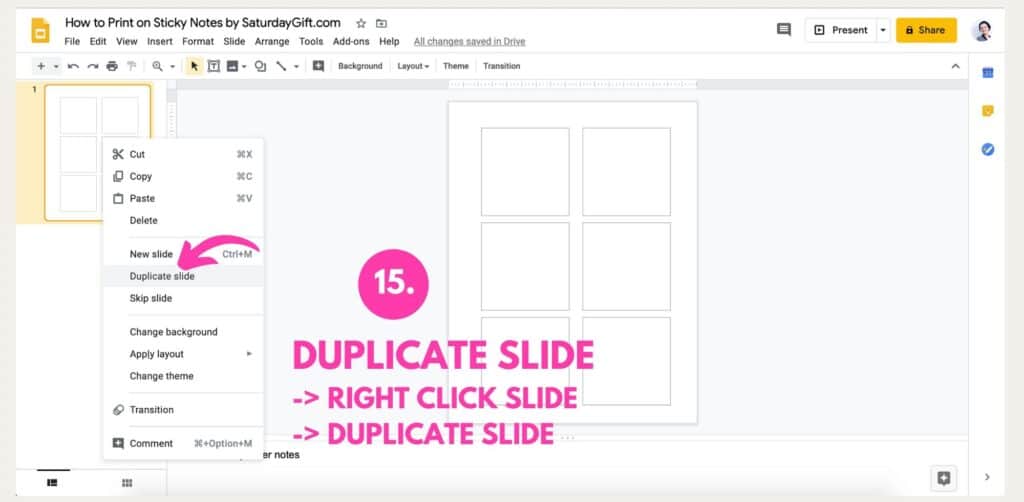
9. Duplicate the slide with the rectangles on it (step 15)
- Right click your mouse
- Choose ‘Duplicate slide’ (15.)
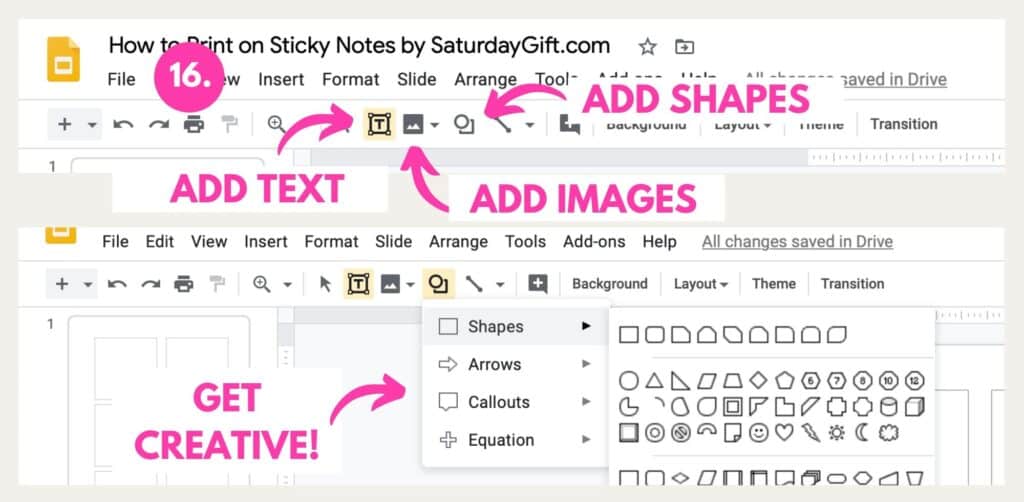
10. Add text, images and/or shapes on the second slide (step 16)
- Add text by clicking the icon that says: Text Box
- Add images by clicking the icon that says: Insert Image
- Add shapes by clicking the icon that says: Shapes
- Get creative! (16.)
Stay within the rectangles.
Those outlines will show you where the Post-it notes will be when you print them.
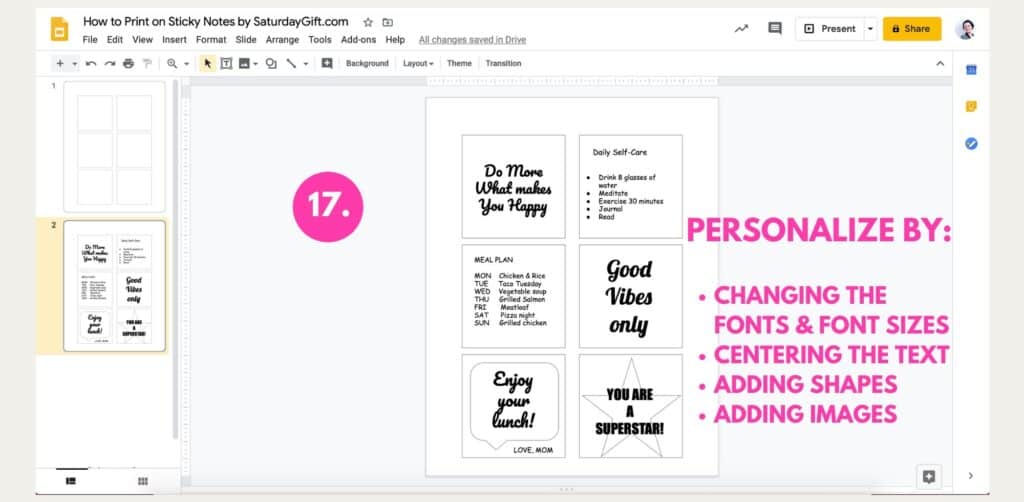
11. Personalize your sticky notes (step 17)
Add your own touch to the designs by:
- Changing the fonts
- Changing the font size
- Centering the text
- Adding shapes
- Adding images
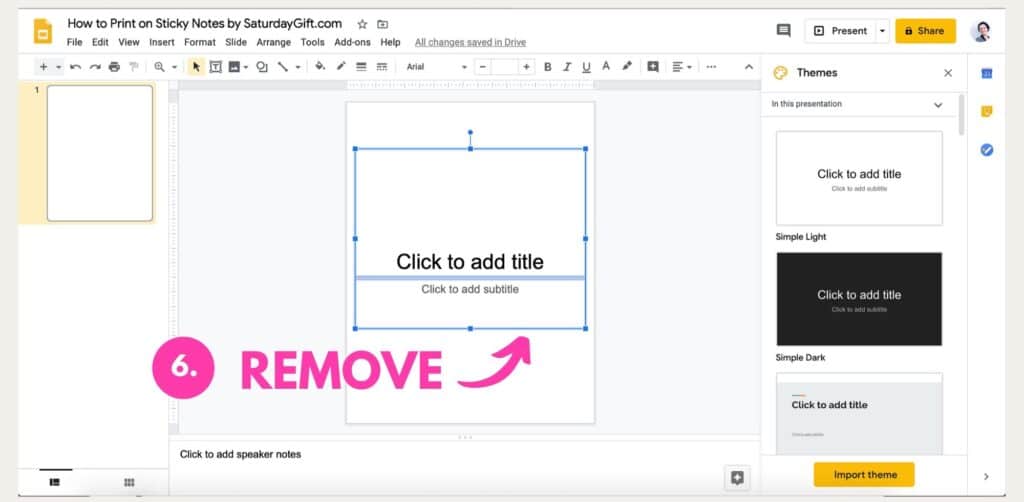
12. When your design is ready remove the rectangles from the TEMPLATE #2 before downloading and printing (step 18)
- It’s important to remove those rectangles because you don’t want to have those on the Post-it notes itself. (18.)
- Don’t remove the rectangles from your first template. Those rectangles on the TEMPLATE #1 will guide you were to add your post it notes.
And now your TEMPLATE #2 is ready! Next you’ll learn how to download and print out these templates.
How to download and print out template #1 and Template #2
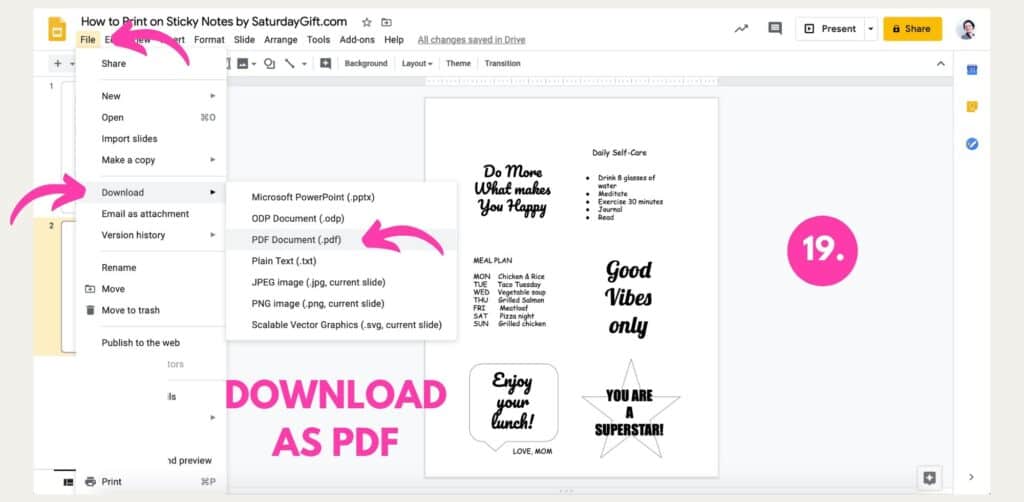
13. Download the TEMPLATE #1 and TEMPLATE #2 as PDF (step 19)
- Go to FILE -> DOWNLOAD -> And choose PDF Document (19.)
14. Print out the sticky note designs you made (step 20)
- Print out the TEMPLATE #1
- Add Post-it notes on the rectangles
- Add the paper back to the paper tray in your printer.
NOTE: Make sure you’re placing it in the right way.
DISCLAIMER: Make sure your printer can handle printing on Post-it notes.
- Print out the TEMPLATE #2
And if you placed the paper correctly in your printer you should have your designs printed on the blank Post-its!

Need new Post-it notes? These are so cute!
15. AND YOU’RE DONE! YAY!
If you placed the paper correctly in your printer’s paper tray you should have your designs printed on the blank Post-its!
WANT PRINT OUT CUTE & PRACTICAL POST-IT NOTES FASTER? USE MY TEMPLATES!
If you rather use my templates and print them out, here are the step-by-step instructions on how to do that!
Step-by-step instructions: How to print on Post-it notes using my templates (Faster way)
Here are the step-by-step instructions with pictures how to print on sticky notes using my templates.
I’ve created my templates on Canva because I like to use fonts I’ve purchased and that’s why these templates might look different from the ones made in Google Slides.
The templates are PDFs so all you need to do is to print them out, add the sticky notes and then print your favorite desing on your Post-its.
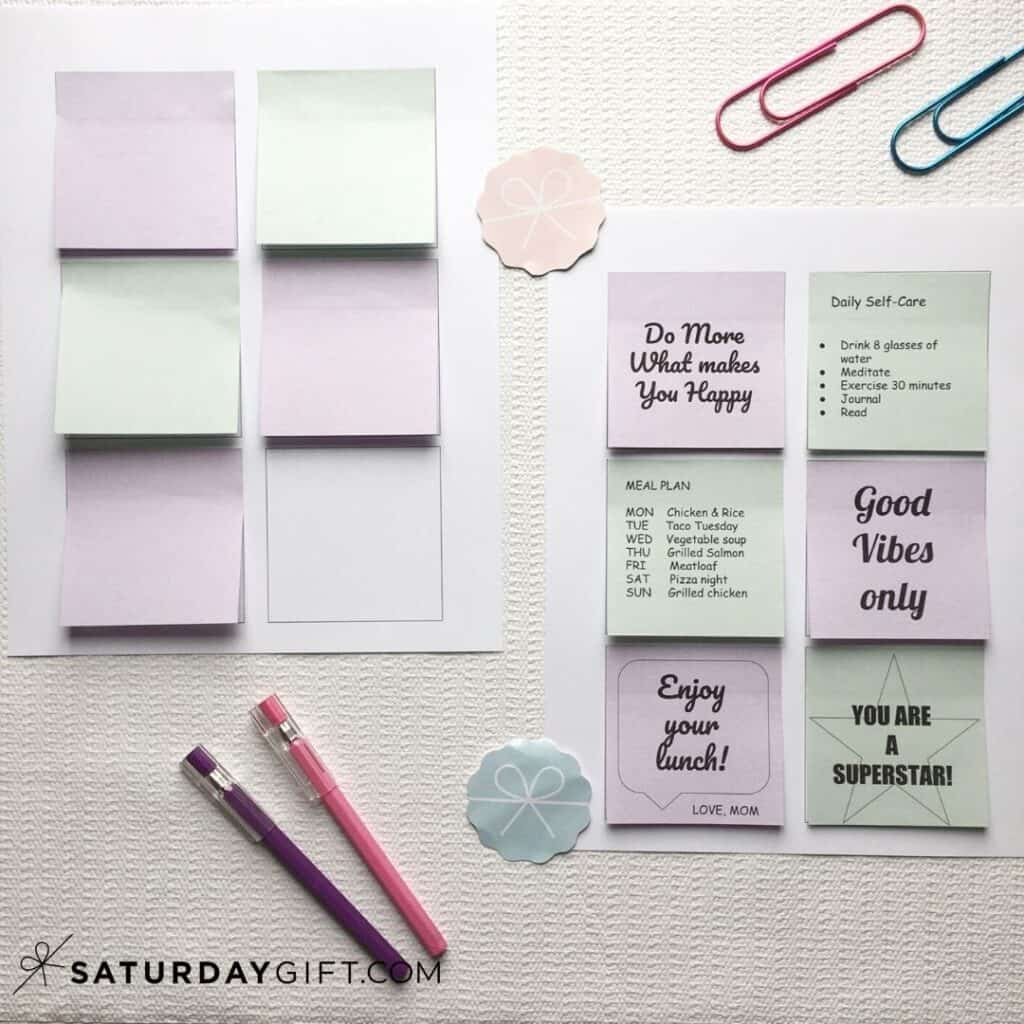
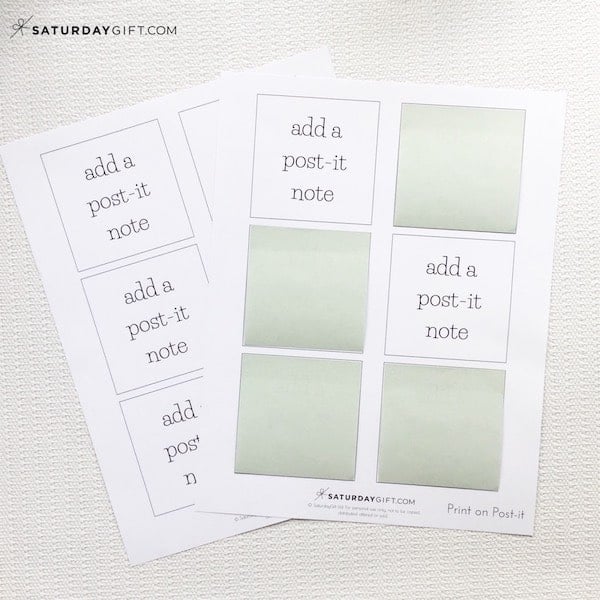
STEPs 1-2: Print the template & add the post-it notes
1. Print the template (the one with 6 squares that say: add a Post-it note) on a plain white paper.
These templates can be found at the very end of this post.
2. Add the blank sticky notes on the template like in the picture below
Psst. I love these bright ones and these pastels ones
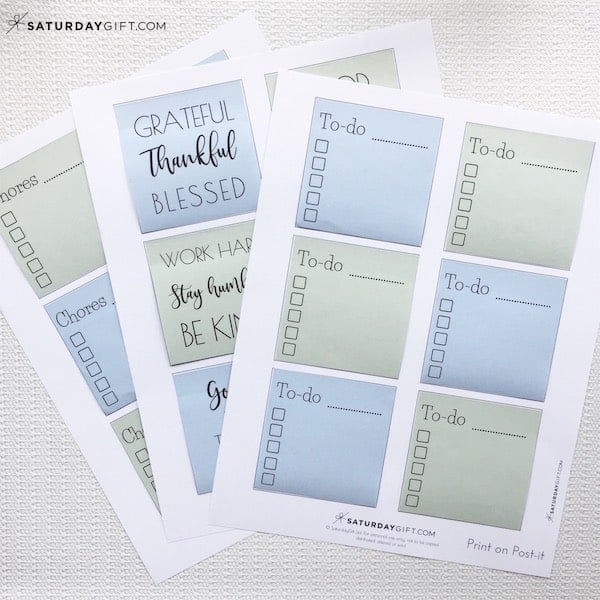
STEPs 3-5: Print your favorite or all three!
3. After you’ve added the Post-it notes on the template, you’ll need to put that paper back into the printer.
NOTE: Make sure you’re putting the paper into the printer the right way. With my HP printer, I’ll need to put it upside down and the “top” of the paper goes in to the printer first. But every printer is a bit different, so check it before you print.
4. Then choose whether you want to print the To-do lists, the chores lists or the motivational quotes. (Or print out all three of them!)
5. Open the file of your choice on your computer and print the one you like on the template with the blank Post-it notes.
EXTRA TIP: You can reuse the template. Take the printed sticky notes away and put new blank ones and print on them.
You can print as many as you need for your personal use.
And tada! You’re done!
My ready-made print on post-it notes templates
You can find the download links for my templates under each image.
All printables ©SaturdayGift Ltd. For personal use only. Not to be copied, altered, distributed, or sold.
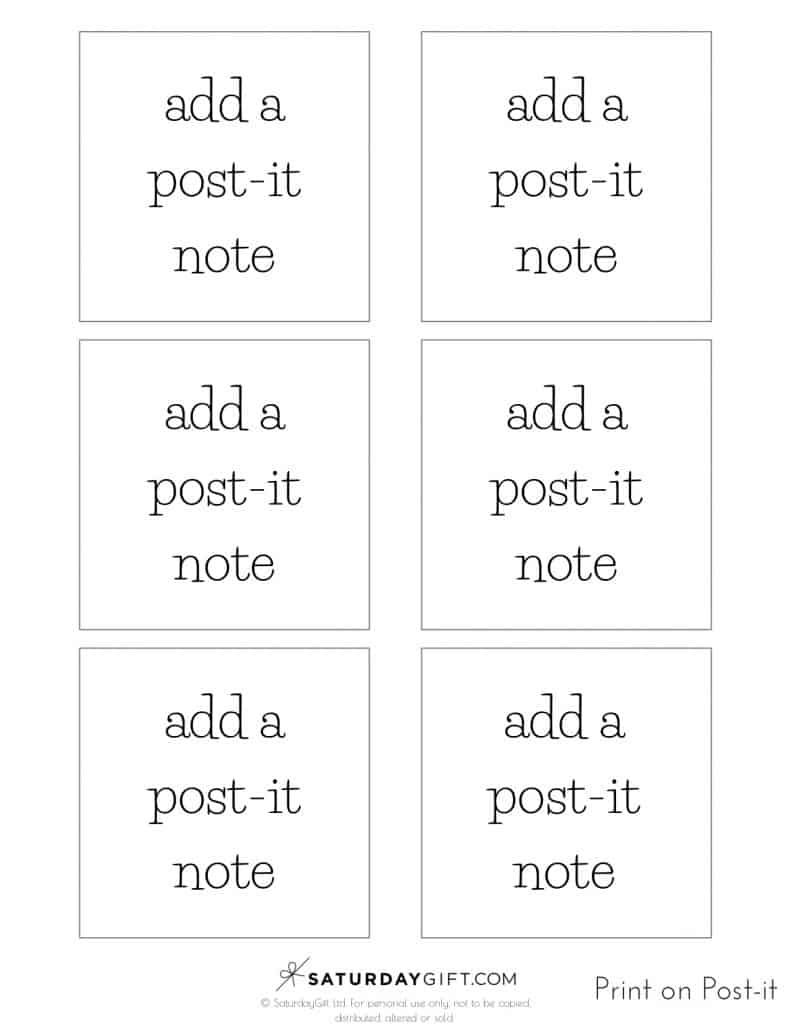
DOWNLOAD: Print on Post-It Notes Template
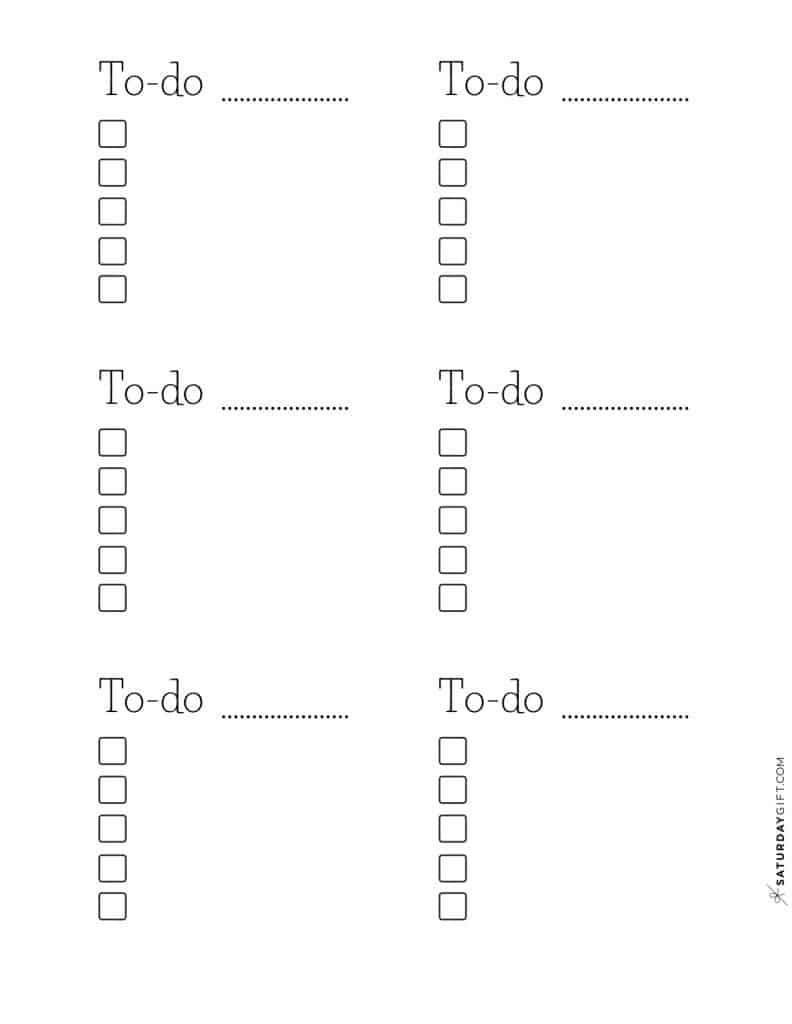
DOWNLOAD: Print On Post-It Notes (To-Do list)

DOWNLOAD: Print On Post-It Notes (Inspirational Quotes)
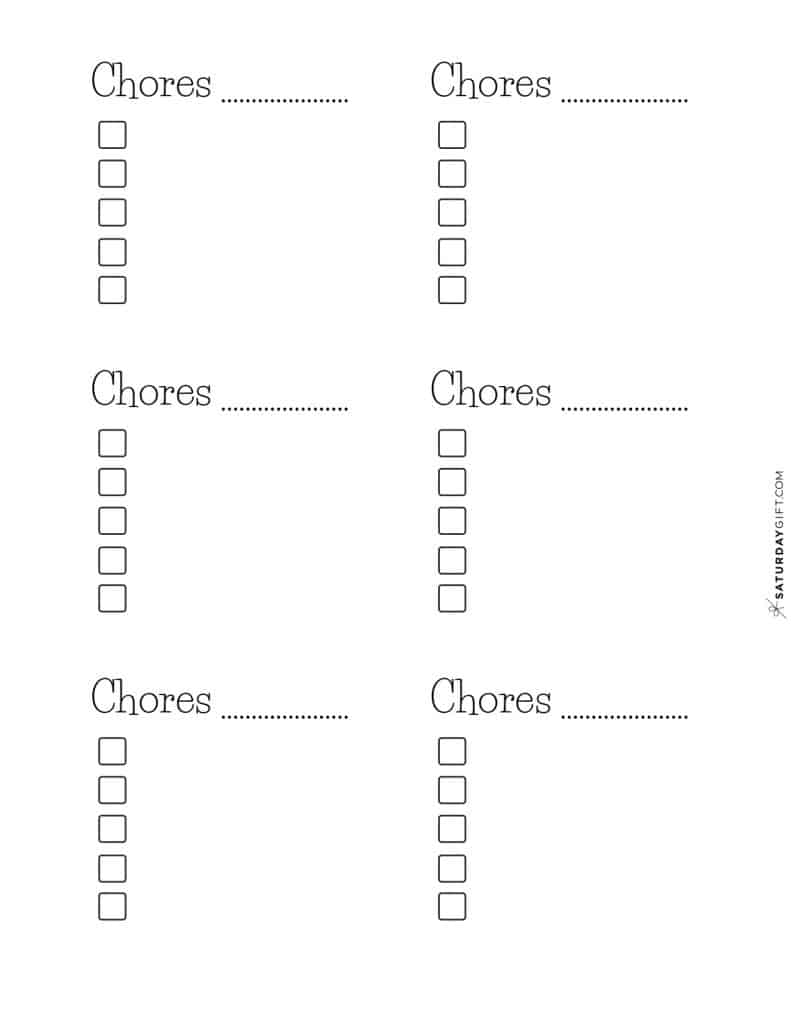
DOWNLOAD: Print on Post Post It Notes (Chores)
© SaturdayGift Ltd. For personal use only, not to be copied, distributed, altered or sold.
How to download my ‘print on post-it notes’ -templates
You can download the print on Post-it notes templates from these links:
DOWNLOAD: Print on Post-It Notes Template
DOWNLOAD: Print On Post-It Notes (To-Do list)
DOWNLOAD: Print On Post-It Notes (Inspirational Quotes)
DOWNLOAD: Print on Post Post It Notes (Chores)
Want to remember this or share it? Pin this post – how to print on Post-it notes – to your favorite Pinterest board or share it on Facebook!