How To Make Dot Grid Paper for Your Bullet Journal Using Google Sheets


Want to create your own printable dotted paper for your
Dot grid paper is perfect for bullet journaling and if you’re worried about using your new bullet journal notebook you can first practice pretty handwriting and making cute drawings using the printable dot grid paper.
RELATED POST: Bullet journaling for beginners – the complete guide to start your first bujo
And here you can find step-by-step instructions on how to make dotted paper using Google Sheets.
Materials I use and recommend
- Printer – I have this HP printer that I absolutely love.
- Paper – I use this HP Premium 32 paper for most of my printables. For half letter printables I’ve found this half letter 32lb paper to be a good option even though it’s not as bright white as I wish it could be.
- Pens for Bullet
Journaling – I love these Sakura pens and these Tombow Dual Brush Pastel Markers
If you need to resize the printable:
- Paper trimmer – I have this paper trimmer from Fiskars, but this smaller one is also great.
- Scissors – I only use Fiskars scissors. Psst! This Fiskars scissors set is so cute!
This post may contain affiliate links, which means I’ll receive a commission if you purchase through my links, at no extra cost to you. Please read full disclosure for more information.
What is dot grid paper
Dot grid paper or dot paper is a sheet of paper that instead of being blank or having lines or grids on it, it has dots on it. The distance between the dots is usually 0.5 cm and depending on the paper size you use there are around 25×40 to 35×50 dots on each paper.
And you can easily make your own dot grid paper using Google Sheets.
Note: You can definitely make dotted paper using Excel/Number or Word/Pages, but because not everyone have those programs I wanted to make this tutorial using a free program that everyone can have access to.
In this post I’m going to walk you through on how to create letter-sized 0.5cm dot grid paper.
But you can use this tutorial to make different sized printable dotted paper as well.
After the step-by-step tutorial, I’ll give you guidelines how to resize your paper and make half letter, A4 size paper and A5 dot grid paper as well.
So here we go.
Don’t want to make your own dotted paper? Use mine!
You can download free printable dot grid paper I’ve made from this post: Free printable dot grid paper for bullet journal (multiple sizes)
Don’t want to print out the dot paper?
There are some good dot grid loose leaf options in Amazon.
Step-by-step instructions on how to make dot grid paper using Google Sheets (DIY)
1. Start by opening Google Sheets
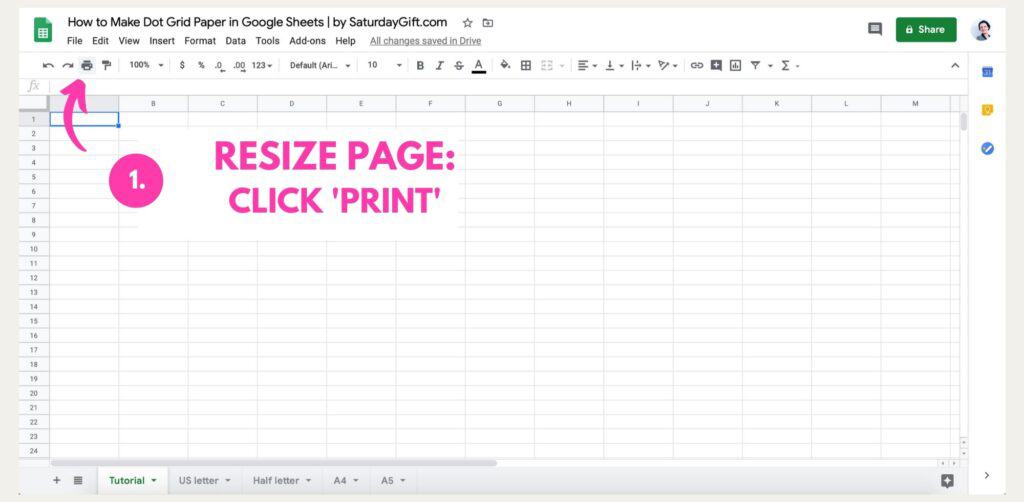
2. Resize your paper/Google sheet (steps 1-4)
- Click “print” (1.)
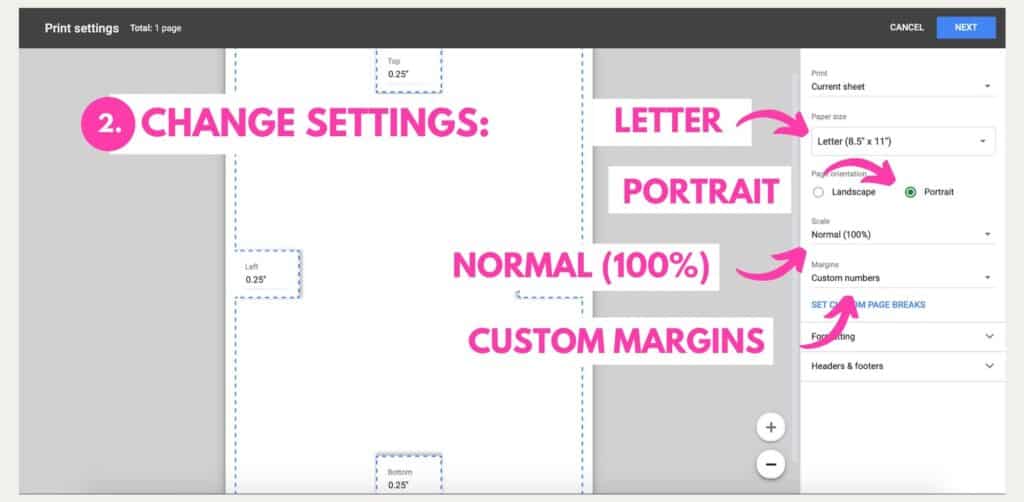
- Change settings (2.):
- Paper size: Letter (8.5″ x 11″)
- Page orientation: Portrait
- Scale: Normal (100%)
- Margins: Custom Margins
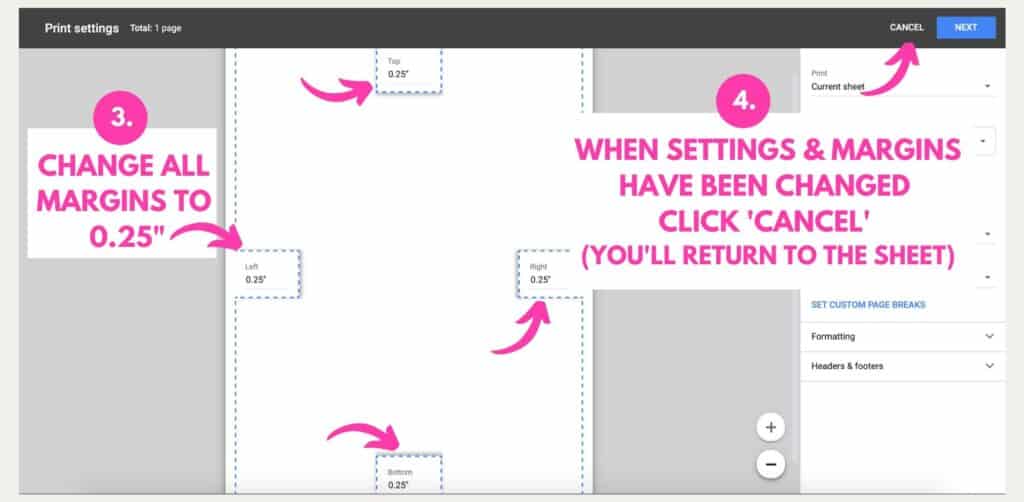
- Change margins (3.):
- Change all margins to 0.25″ (Top, Bottom, Left and Right)
- After you’ve changed the settings and the margins click “cancel” (4.)
- Don’t worry! You won’t lose your settings you just made. You’ll just return to the sheet.
In the next steps I’ll show you how to make letter sized dot paper.
US letter: Columns A-AL, Rows 1-53.
If you want to make different size paper use these:
Half letter: Columns A-X, Rows 1-40 (you can skip steps 9-11)
A4: Columns A-AK, Rows 1-56
A5: Columns A-Y, Rows 1-39 (you can skip steps 9-11)
Psst! Want to know what sizes A4 and A5 are? Check out this post: What size is A4 paper? A Complete Guide to international paper sizes (A0 to A10)
3. Resize the columns + add extra columns (steps 5-11)
- Resize the columns to create the right size grid for the dots:
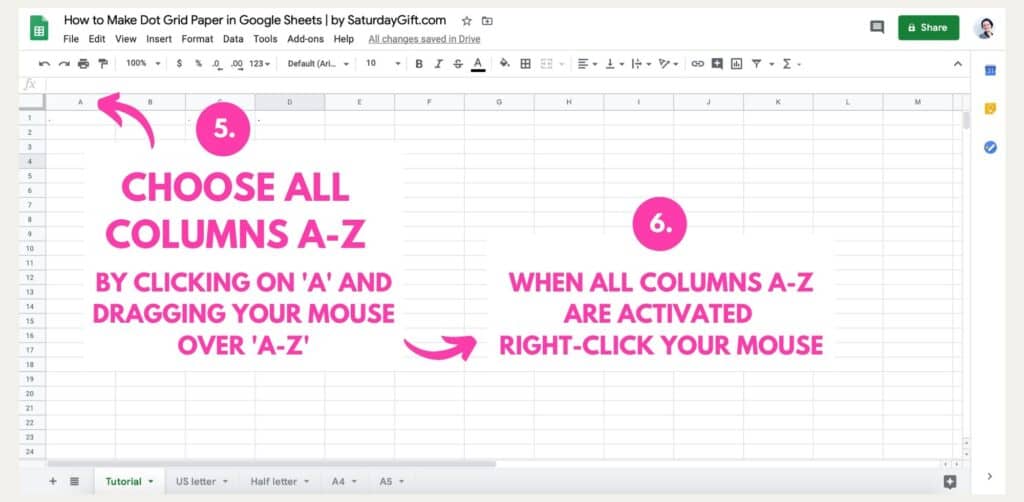
- Choose all columns from A to Z by clicking on ‘A’ and dragging your mouse over A-Z (5.)
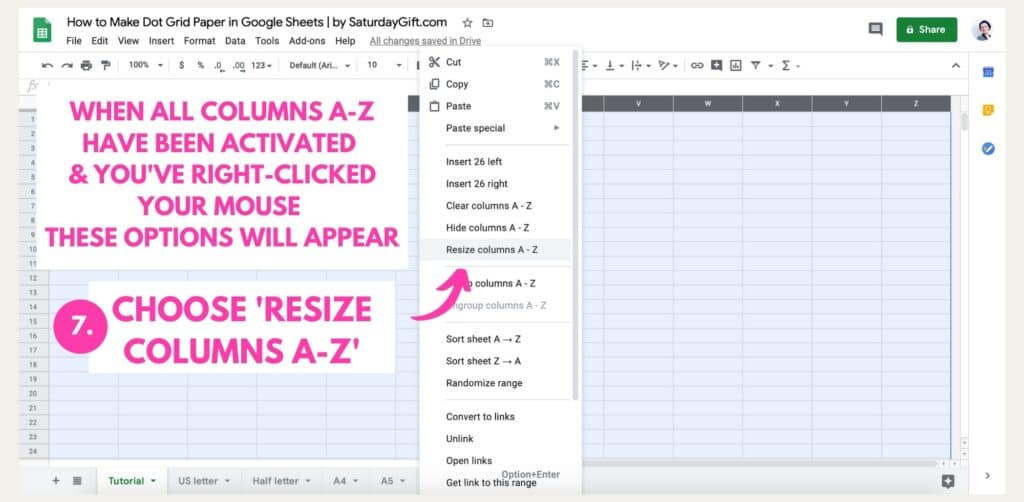
- When all columns from A to Z are active, right-click your mouse (6.) and a menu appears
- Choose ‘Resize columns A-Z’ from the menu (7.)
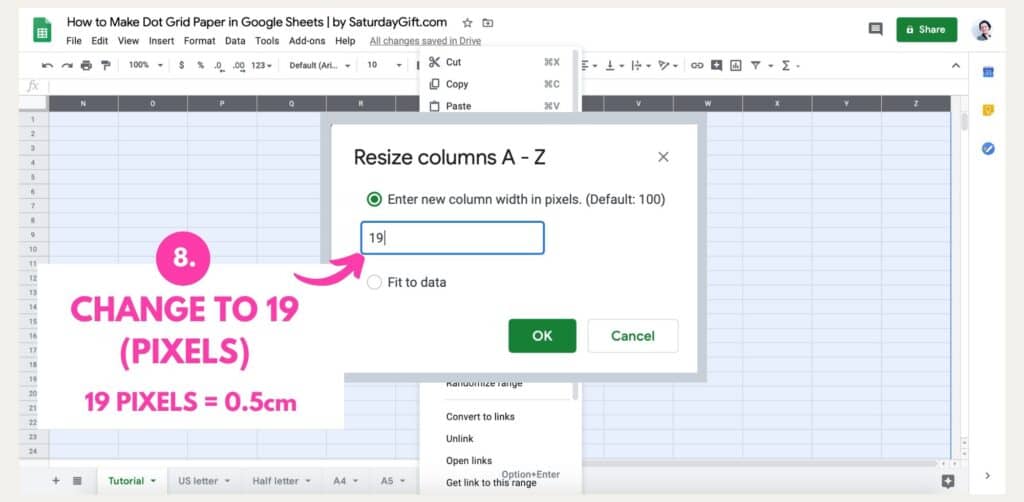
- Change the pixels to 19. (8.)
- We want to create a dot grid paper where the distance between the dots is 0.5 cm.
- 19 pixels = 0.5 cm.
- Add more columns to create enough columns and dots for a letter sized paper. (9.-10.)
- Google sheets only gives you columns from A-Z so we need to add more columns. If you use Excel or Pages you should be able to skip this step.
- Add more columns by choosing ‘A-M’ by clicking on ‘A’ and dragging your mouse all the way to ‘M’.
- Copy columns A-M by clicking command+C on Mac or CTRL+C on Windows.
- Click on Z and paste the copied columns by clicking Command+V on Mac or CTRL+C on Windows. (10.)
- You should end up with columns from A to AL. (11.) That’s enough columns to create a letter sized paper.


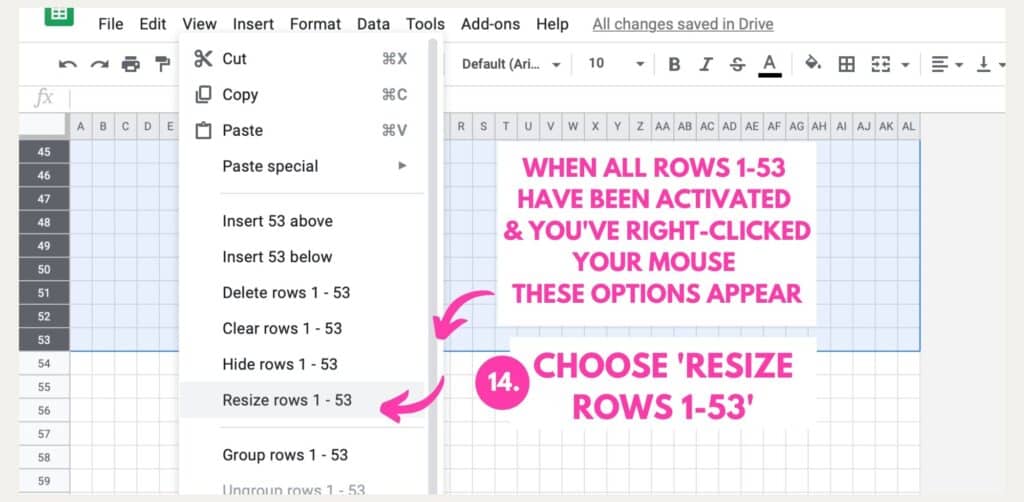
4. Resize the rows (steps 12-15)
- Resize the rows to create the right size grid for the dots:
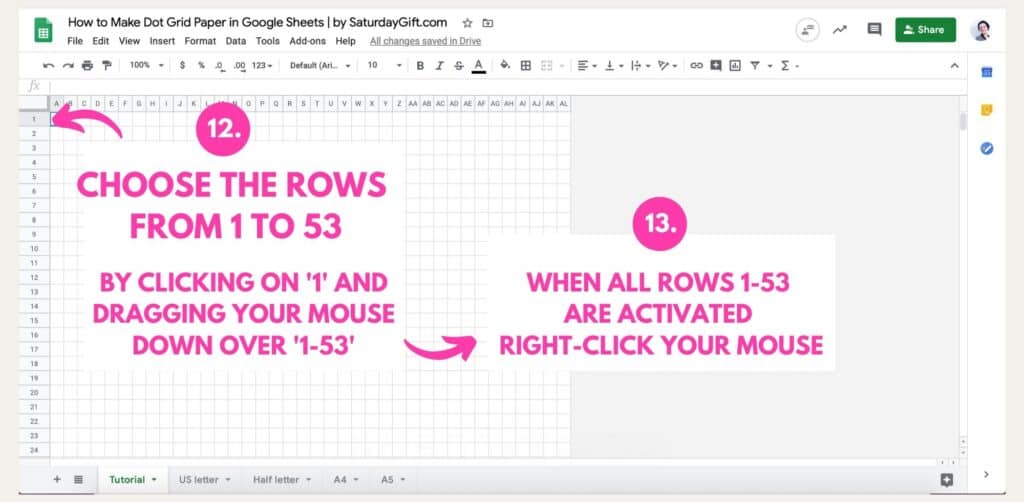
- Choose the rows from 1 to 53 by clicking on ‘1’ and dragging your mouse down all the way to ’53’
- When all rows from 1 to 53 are active, right-click your mouse (13.) and a menu appears
- Choose ‘Resize rows 1-53’ from the menu (14.)
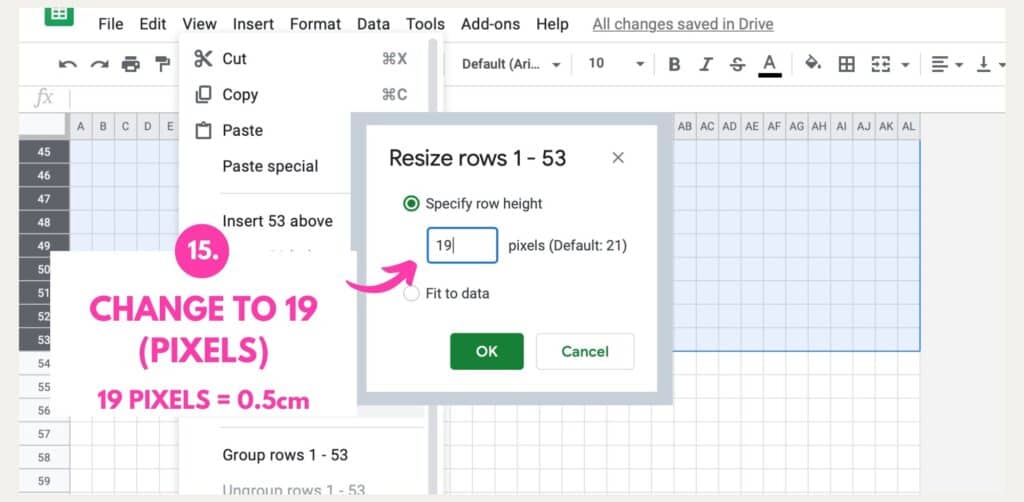
- Change the pixels to 19. (15.)
- We want to create a dot grid paper where the distance between the dots is 0.5 cm.
- 19 pixels = 0.5 cm.
- After you’ve done this you’ll end up with a google sheet that has the right sized columns and rows on it and now we can add the dots on the grid.
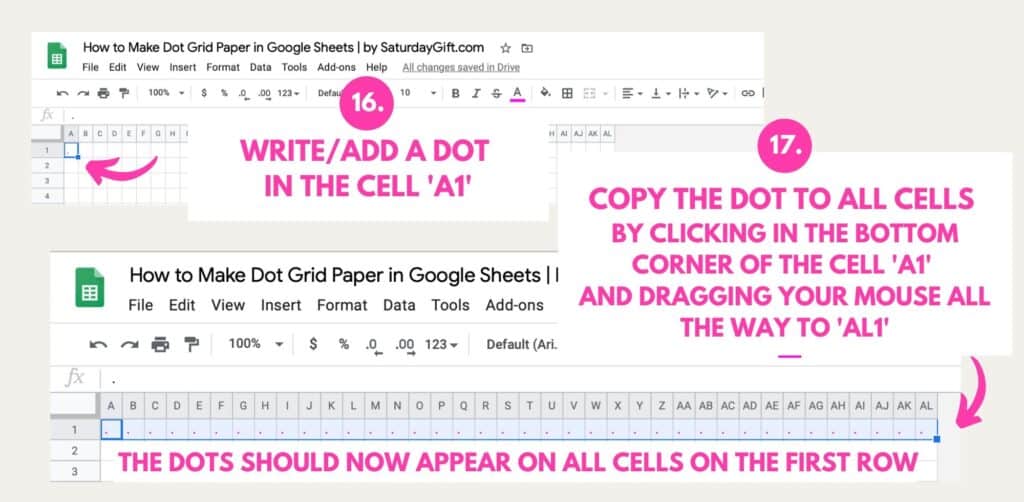
5. Add dots on the cells (steps 16-18)
- Write a dot in the cell ‘A1’. (16.)
- Copy the dot to all cells on the first row by clicking in the bottom corner of the cell ‘A1’ and dragging your mouse all the way to ‘AL1’. (17.)
- The dots should appear on all cells on the first row.
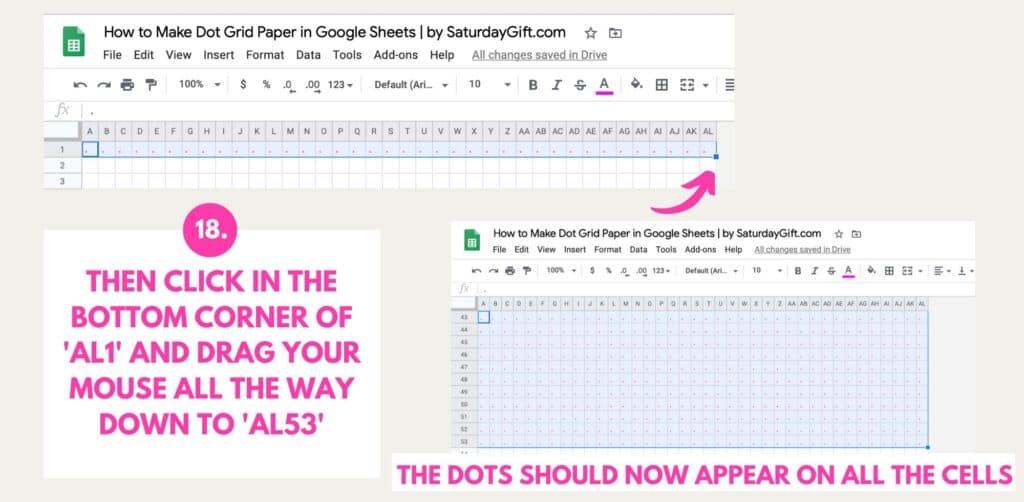
- Then click in the bottom corner of ‘AL1’ and drag your mouse all the way down to ‘AL53’. (18.)
- The dots should appear on all the cells.
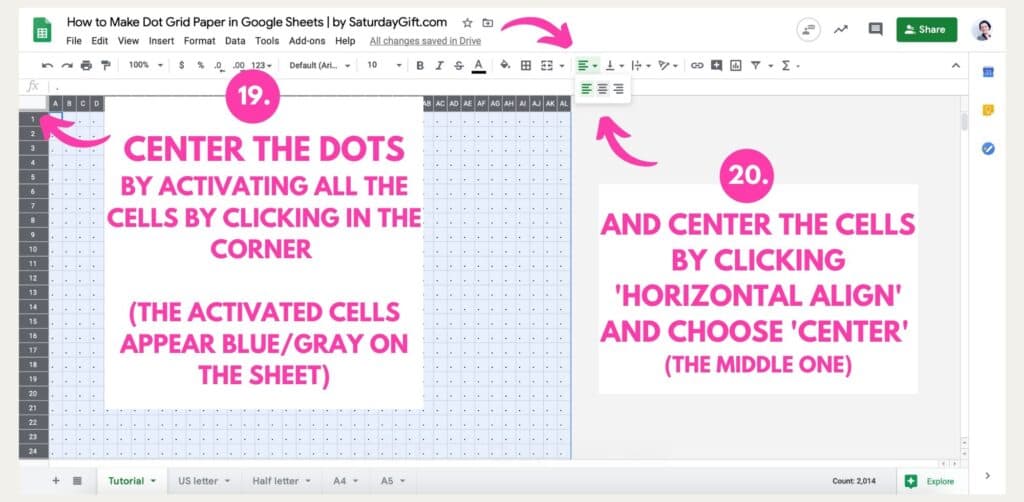
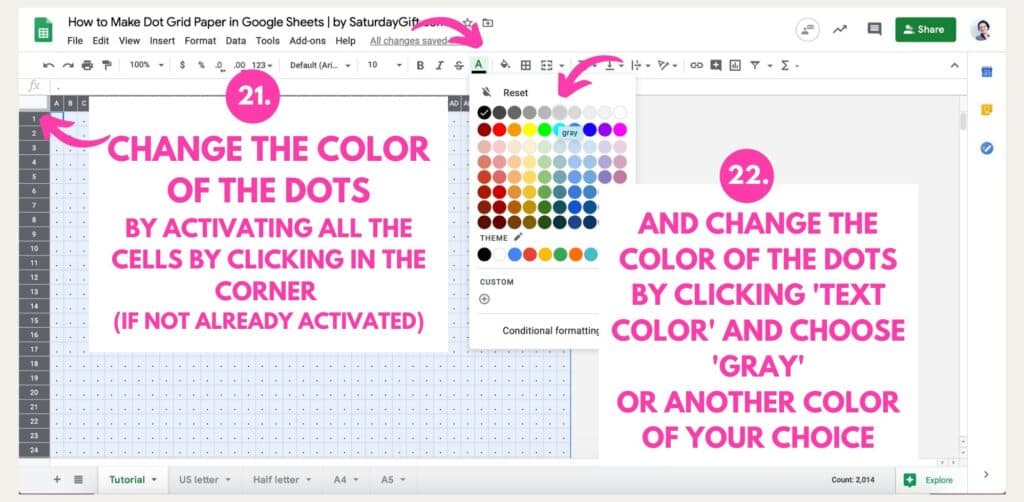
6. Center and change the color of the dots and (steps 19-22)
- Center the dots by activating all the cells by clicking in the corner – the activated cells appear blue/gray on the sheet. (19.)
- Center the cells by clicking ‘Horizontal align’ and choose ‘Center’ – the middle one. (20.)
- Change the color of the dots by activating all the cells by clicking in the corner – if they’re not already activated. (21.)
- Change the color by clicking ‘Text color’ and choose ‘Gray’ or another color of your choice. (22.)
- The color ‘Gray’ creates light enough dots that they’ll still help you write and draw but don’t show too much on the paper.
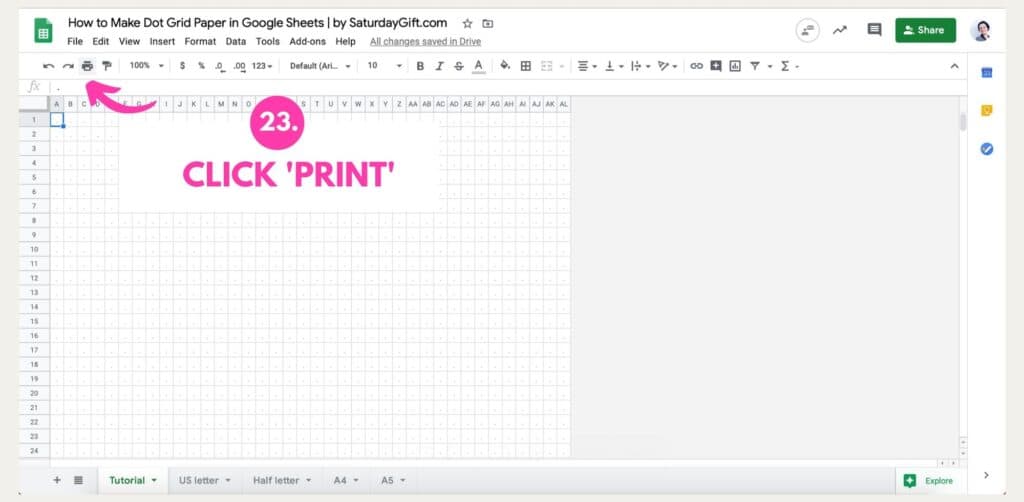
7. Print the dot grid paper you’ve created (steps 23-25)
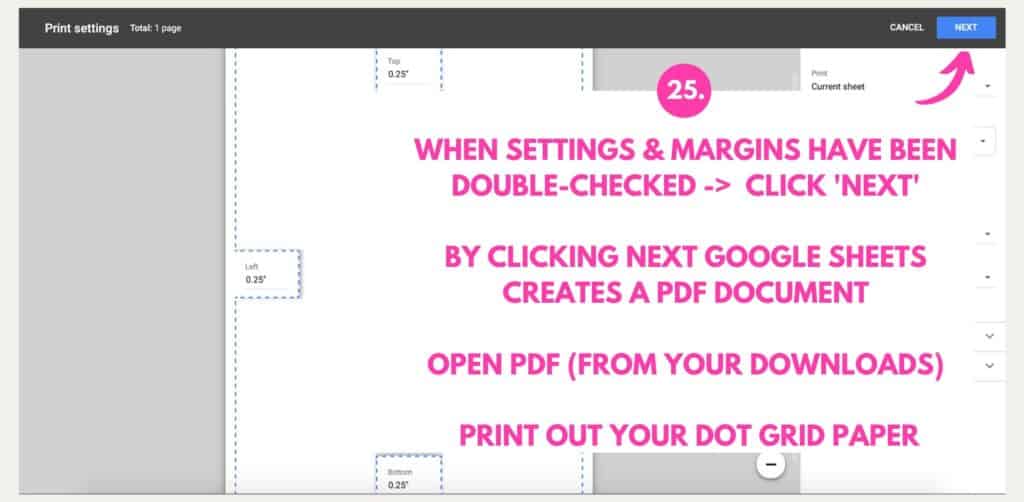
- Click ‘Print’ (23.)
- Double-check settings (24.):
- Paper size: Letter (8.5″ x 11″)
- Page orientation: Portrait
- Scale: Normal (100%)
- Margins: Custom Margins (all 0.25″)
- Formatting: De-select ‘Show gridlines’ & ‘Show notes’
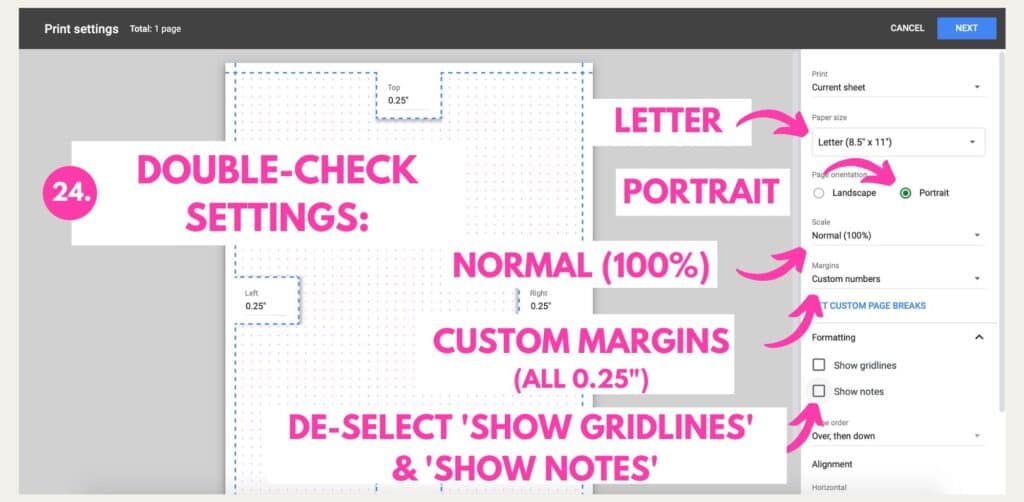
- When you’ve double-checked the settings & margins, click next (25.)
- By clicking next Google Sheets creates a PDF document of your dot grid paper
- Open PDF from your downloads
- Print out your dotted paper and add it to your notebook, binder, planner or
bullet journal or use it as-is.
8. Want to make different size dot grid paper?
- Steps 1-4 are the same
- When you resize the columns (steps 5-11) and rows (steps 12-15) choose these dimensions instead:
- Half letter:
- Columns from A to X
- Rows from 1 to 40
- A4:
- Columns from A to AK
- Rows from 1 to 56
- A5:
- Columns from A to Y
- Rows from 1 to 39
- Steps 16-25 are the same as in the step-by-step tutorial .
I hope you were able to create the dot grid paper using Google Sheets and let me know in the comments if you did!
RELATED POST: Bullet journaling for beginners – the complete guide to start your first bujo
Want to remember this?
Pin this post – how to make printable dot grid paper in multiple sizes – to your favorite Pinterest board.
Thank you so, so, so much for doing this tutorial! I was able to expand it to do 2 half size for printing double sided on letter paper. I wasted so much time searching the web for something already constructed, and here were instructions on how to get exactly what I needed. Thank you again!
Yay! Thank you so much for your comment, Laura! I’m so happy to hear you found this tutorial helpful and that you were able to create exactly what you needed! Love it!
Cristina
Creator of SaturdayGift
Thank you for the tutorial. Takes a little work, but its nice to learn how to manipulates google sheets. It becomes intuitive after a little practice.
I found the dots on every other line to be most useful without being to intrusive.
Hi Don.
I’m glad to hear you found the tutorial helpful and that you were able to create the dot paper for your needs by having dots on every other line. I have to try that too!
And if you ever need to print out dot paper fast, I have another post where you can download ready-made printable dot paper in multiple sizes instantly without signing up: Printable Dot Grid Paper for Bullet Journaling – multiple sizes
Sincerely,
Cristina
Creator of SaturdayGift.com
This was extremely helpful! I fancy myself a knowledgable person with Google Sheets/Docs but THIS was new and is amazing. Thank you for offering this step-by-step!
How can I adjust this to make two half sheet grids in landscape mode? I’d like to cut each sheet in half, but I’m not sure how/where to make a center margin.
Hi! What a great question!
I tested a few options in Google Sheets and this is how you can print two half letter pages on a US letter:
1) Do the instructions as you would create one half letter page (you should now have dots from A-X)
2) Then copy the columns A-X and insert them next to the columns A-X (now you should have columns from A to AV with dots).
3) Then select column Y and insert two empty columns in the way that Y and Z are empty and the dots are in the columns AA to AX.
4) Then use the instructions on the post to print (and choose the US letter size paper.).
5) Make sure the margins and the other printing settings are as instructed in the post
After you’ve printed you can just cut the paper in the middle.
Let me know if this helps!
Sincerely,
Cristina
Creator of SaturdayGift
I’d like to make 11×17 dot grid paper. Can you help me figure out the right dimensions for that? Thanks!
Hi Saralynn,
Thank you for reaching out.
I haven’t done/printed 11×17 dot grid paper before but I was able to come up with these dimensions.
I’ll add a few screenshots.
So if you use the same instructions but you’ll add a few extra columns and rows it should work.
I was using the US letter size dimensions first and added extra columns and rows to that.
So add extra dots from A to AX and then from 1 to 83 and when printing choose CUSTOM SIZE and write 17″ and 11″ and choose Portrait and that should do the trick.
Here are the screenshots.
https://www.saturdaygift.com/wp-content/uploads/Dot-Grid-paper-dimensions-for-11×17-SaturdayGift.png
https://www.saturdaygift.com/wp-content/uploads/Dot-Grid-paper-dimensions-for-11×17-printing-SaturdayGift.png
I hope this helps!
Sincerely,
Cristina
Creator of SaturdayGift.com
That was so helpful! Thank you so much for the tutorial, I saved it as a PDF and then added it to my digital planner 🙂
Very great tutorial!
I spended so much time in search of a A5 dotted page, and thanks to you I found what I was looking for. Not only that, with your method I can create grid pages and probably also lined pages, working on the edges of the grid (making it a dotted line) and not placing the dots. Thank you so much, you gave us all a great gift!
Blesses from Italy and a Happy new year!.
Vincenzo